I am happy to announce that I am one of 28 local artists who recently created the Lawrenceville Artists Network. We have gallery space for exhibitions and a small room for classes . All this is located in the heart of picturesque Lawrenceville, NJ.
at 2683 Main Street on the corner of Gordon Ave. and Main Street.
Upcoming felting classes:
4 Thursdays in January, 6:30- 9:30 pm
7th & 14th January 6:30- 9:30 pm: Hat-on-a-ball
Here is a fun way to create a 3-dimensional round shape that can be turned into
a vessel or a hat or even a bag! We will felt over an inflatable plastic ball using
dyed carded wool plus yarn and fabric scraps for embellishment.
Beginners are welcome!
Price: $40, materials included.
21st & 28th January 6:30 - 9:30 pm: All small things felted
We will be making balls, beads, strings and small flat pictures with wool, silk,
and other fibers and fabrics.
Price: $40, materials included
2 Sundays in February, 10 am to 5 pm
7th February 10 am to 5 pm: Scarves and other flat things
Make a scarf, a small wall hanging or a table runner by
combining dyed carded wool with silk, linen and cotton
fabrics and other natural fibers. Expect a bit of physical
work while rolling the wool into felt. No previous
experience necessary.Ages 15 and up
Cost is $80, including materials
21st February 10 am to 5 pm: Small rug
We are going to make a thin but very strong felted
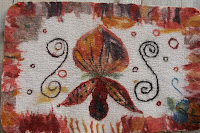
rug using cotton muslin fabric with Norwegian wool
for extra durability. Approximate finished size will be
15" x 25". Instructions to make very detailed design
will be presented.Bring a drawing or a photo to work
from or use one of instructor's books. Expect a bit of
physical work while rolling the wool into felt.
No previous experience necessary. Ages 15 and up.
Cost is $80, including materials
Sign up early , class size is very limited!
Register by emailing to tothpiroska@gmail.com
or by calling 609-240-1619
Saturday, December 26, 2009
Tuesday, October 13, 2009
Saturday, October 10, 2009
International Day of Felting and FeltUnited Birthday Girl 10/3/2009
What a great opportunity to promote felt AND present a good friend with a scarf in "FeltUnited" colors on her 40th birthday!! A simple construction of yellow & red -short fiber- merino on a light yellow & red silk chiffon . I overlapped the 2 silk colors to generate some orange. I started one end with yellow wool crosswise and moved towards the other end carding more and more red into the yellow. Finished up with red down at the other end ;so one corner became "very" yellow and another "very" red with hues of orange in between. I left some silk exposed for added surface design. More about the 1st International Day of Felt at www.feltunited.com
Monday, May 18, 2009
Friday, May 01, 2009
SILK - The miracle of methamorphosis
A new post has been long overdue and I thought that last week's silk workshop by fiber artist Renate Mail-Moskovitz would be a perfect opportunity to restart writing.....
The silkworm by itself looks nothing unusual: if you are not fond of creepy-crawlers it will not be a "love at first sight"!
They start out as tiny black dots and live an amazingly boring life. They feed ONLY on mulberry leaves; in fact they rather die than try new food. There is a point when they can't eat any more....and that is when the miracle starts! They spin their spit into a cocoon: first the outer shell, then the continuous, 1-mile-long, super thin silk thread that actually has a diamond shaped cross section (2 triangles, to be precise). This gives silk its shine.
It takes 2 1/2 days for the silkworm to finish the job. The innermost layer is another, very strong shell. When the moths come out, they only live to mate.
Just before they die , the females lay 300 to 500 eggs.....and the cycle starts again.
...to be continued
Friday, March 28, 2008
I have been felting.....
Honfoglalás kori övcsat mintája
This is the piece I made at Mehmet's class in February.
The design is a belt buckle from 9th century Hungary . We used Turkish merino, and muslin fabric between the layers.
My piece has natural colors except for the border.
This is an orchid that Theresa started at that same workshop and I finished it ( she was way too busy to work on it) with whatever leftover I found after the students were gone....it would have been a waste to throw all that wet wool out!!
The white muslin shows up really nice on this piece.
Cabbage soup with sausage
Magyarul itt
It is more like a winter soup and it is already spring, I agree, but it tastes delicious! I made it for a bunch of my friends for March 15th to celebrate this Hungarian National Holiday. They all loved it! For dessert we had Kürtőskalács on the grill, and that was even a bigger hit!
The recipe for this soup is sooooo easy .....of course when you make it for a crowd you need to double or triple it!
1/2 white cabbage
2 big carrots
1 lb. potatoes
1 onion, cut up
2 cups of stock or even better if you have some leftover sauce from a chicken or duck roast ( you know, the jellied stuff at the bottom of your roasting pan. I freeze them in small batches), or you can just use water....
basil, bay leaf, thyme, caraway seed and salt to taste
1/2 of a Polish kielbasa or any sausage (about a 7-inch-piece), cut up and sauteed in a pan for 5 minutes .
Saute the onion in a tsp. of oil ( I used duck fat) for a couple of minutes. Cut up the veggies more or less the same size (not too small), add them to the onion, add the stock/sauce and enough water to cover + a little bit more . Season it but be careful with the salt! When the veggies are almost done add the sauteed sausage pieces, too and cook them together for 5 more minutes. Serve it with home made bread and Bull's Blood red wine (that is the only Hungarian wine available locally) Enjoy!
Thursday, March 27, 2008
Káposztás kolbászos egytál VKF! XIV.
Here in English
Úgy tűnik, hogy VKF! lázban égek! Eredetileg csak 1 receptet akartam közzétenni, de Maci biztató szavaira belelkesedtem és tessék, már a harmadiknál tartok..Mit csináljak, mindig ez van, ha valami újdonság magával ragad. Ez esetben nem a sütésről-főzésről van szó, hanem a blogirásról.Régen esedékes volt, nemezügyben sokan kérdezték már hogy van-e.Aztán gondoltam, legyen egy vegyes blog, majd meglátjuk meddig birom. Ugyan mindkettő szerves része az életemnek, de azért vannak periódusok amikor hol az egyik hol a másik kerül fölénybe. Kicsit erről is szól ez a blog: hogyan hullámzik az életem a konyha és a nemezstúdió között a kreativitás tengerén.
Nos, hogy a sok tészta után együnk is valamit....Ime életem LEGELSŐ egytálétele,még boldogult egyetemista koromból.Szerintem határozottan magyaros (izvilágnak megfelelő) hozzávalókkal és végtermékkel. Nem mondom, hogy öröm ránézni, bármilyen szögből fotóztam , nem lett "kivánatosabb". Viszont nagyon bomlottak érte az amcsik, nekem alig maradt belőle!!! Még állitólagosan vegetáriánus izraeli barátnőm is nagykanállal ette , kikerülve a kolbászkarikákat....Nem mondtam neki (akkor már olyan mindegy volt) hogy volt abban azért más is a kolbászon kivül.
Eredetileg Lajos Mari 99 gyüjteményéből, kissé átvariálva a szájam ize -és a hűtőm tartalma -szerint.
1/2 fehér káposzta
2 nagyobb vagy 4 kisebb répa
1/2 kg krumpli
1 durvára vágott hagyma
1 ek. kacsazsir/olaj
kb. 1/2 l. kacsa pecsenyelé/szósz, (hús sütéséből visszamaradt, mélyhűtőből kiolvasztott...jó kocsonyás!) Ez utóbbi hiányában persze marad a sima húsleves ill. viz.
Só (óvatosan ha pecsenyelét használunk)
kakukkfű, köménymag, bazsalikom, babérlevél (izlés szerint)
1/2 pár füstölt kolbász, karikára vágva és átsütve
A zöldségeket nagyjából egyforma darabokra vágjuk. Kacsazsiron megfonnyasztjuk a hagymát . Hozzáadjuk a zöldségeket, felöntjük a pecsenyelével majd hozzáadunk picivel több vizet,mint ami ellepi. Fűszerezzük. (Érdemes teatojásba tenni a fűszereket, mert akkor egy ici-picivel több esélyünk van rá hogy a gyerekek is esznek belőle. Legalábbis nálunk a legkisebb....)
Mikor a zöldségek már majdnem teljesen megpuhultak akkor hozzáadjuk az átsütött kolbászkarikákat és még pár percig együtt főzzük.
Local happenings....
In May my friend, Ifat Shatzky is going to show her amazing paintings at Small World Coffee on Witherspoon st. Check it out!
Wednesday, March 26, 2008
Pogácsa....a javából VKF! XIV.
Here in English
Magyar(os) ételeket késziteni, izeket varázsolni lassan már szép hazánkban is kihivás hát még külföldön , főleg a hozzávalók hiánya miatt. Azért persze nem adja fel az ember olyan könnyen az alapanyag keresgélést a civilizáció eme szegletében (sem)! Különösen ha olyan ételről van szó, amit nagyon szeret. Bevallom nekem egyik gyengém a pogácsa. Leginkább anyám pogácsája, aki szerint pedig pogácsát -egy jó háziasszonynak- bármiből kell tudni késziteni. Szerintem pedig leginkább juhtúróból érdemes! Az meg itt nincs, akárhogy keresem. Kénytelen vagyok beérni a hagyományos tehéntúróval, ami errefelé szintén nem triviális. Marad a remény hogy egyszer majd a juhtúró is begyűrüzik és elindul amerikai hóditó útjára.
De legalább -végre- egy könnyű recept, nem úgy mint ez itt. Ugyan nem kimondottan diétás. Igaz, nem is ez volt a feladat. Viszont ami a baráti körünkben igen jól jön, tojásra allergiások is ehetik. Legalábbis ezt a verziót, mert persze lehet aztán millióképpen variálni.
1/2 kg tehéntúró
1/2 kg vaj
1/2 kg liszt
1 tk. só
A szobahőmérsékletű hozzávalókat összegyúrom, lisztezett deszkán 1 cm vastagra kinyújtom, pogácsaszaggató segitségével először diszitem (sok-sok kört rajzolok a tészta tetejére) majd kiszaggatom a pogácsákat, sütőlapra rendezgetem és 2oo fokon kb 2o-25 perc alatt megsütöm.
Slussz! Mondtam hogy könnyű lesz....a recept. Azért fogyasztani csak módjával! Jó étvágyat!
Cheese Biscuits
Magyarul itt
Here is something that doesn't need half a day to prepare (like this or this), yet everybody always loves it.
It is not necessary a diet food, but it is ideal for people with egg allergy.....something to think about when you bake for a crowd.
Heat oven to 400F
Mix the following ingredients together:
1 lb. (450 g) farmers cheese
1 lb. butter (I told you it wasn't no diet food)
1 lb. flour
1 tsp. salt
Roll it out 1/2 inch thick on a floured board . At this time you can make a simple design on top by making lots and lots of overlapping circles with the round cookie cutter (be careful NOT to cut through the dough at this time!) .When you are happy with the design cut out circles , place them on a baking sheet and bake for 20-25 minutes.
Tuesday, March 25, 2008
Kürtőskalács - Hungarian grilled sweet bread
(magyarul itt)
Kürtőskalács: I found many different translations on the web : chimney cake, stove cake, spit fired donuts (?) .The cylinder shape recalls the shape of the stove pipe or chimney pipe hence the name "kürtő". "Kalács" means challah. Originally it comes from Transylvania as a holiday bread/ wedding cake and lately became a real street attraction both there and in Hungary. People hardly ever make it at home because of the tools it requires but as you will see it is not impossible!
The recipe is practically a sweet yeast bread:
6 1/2 cups flour
5 Tbsp. sugar
pinch of salt
1 envelope instant dry yeast ( 1 Tbsp)
zest of 1 lemon (optional)
2 1/2 c warm milk
1/2 c. melted butter
3 eggs, beaten
zest of 1 lemon (optional)
2 1/2 c warm milk
1/2 c. melted butter
3 eggs, beaten
You can mix everything in a bread machine (if you have one) on the dough program. If you don't have one:
In a BIG bowl mix dry ingredients. Mix milk, melted butter and the eggs. Add it to dry ingredients. Knead it for a couple of minutes either by hand or by a wooden spoon: this can be done by pulling the dough towards you with the spoon and keep turning the bowl.This should not take more than 2-3 minutes. When touched and the dough doesn't stick to your fingers cover and let it rise for about an hour. Then punch down the dough and give it another 15-minute rest. Now it's ready for grilling!
Grilling? You can actually bake the whole thing in the oven as a regular sweet bread or challah but I strongly suggest to give it a try on the BBQ! Well , needs some hardware the very first time. The original version is baked around dowels at least 4 inch (10 cm) thick and 10 inch (25 cm) long but you can home-make smaller ones. The dowel I used was 1.5 in (3 cm) in diameter. I cut it up into 8 inch (20 cm) pieces.(We are making at least 3 , right?) These are going to be the top parts. You need to drill a hole (make it long into the wood) at one end to attach a steel rod about a yard/meter long. You probably will need to hammer it, too. For the handles I used a 1-inch-thick (2 cm) dowel at the other end cut into 5-inch (12 cm) lengh. (Drill, hammer as with the top). Originally this idea of the smaller dowels comes from a great nursery school teacher in Hungary. It's perfect with kids and adults. (well , it grills faster ....obviously)In a BIG bowl mix dry ingredients. Mix milk, melted butter and the eggs. Add it to dry ingredients. Knead it for a couple of minutes either by hand or by a wooden spoon: this can be done by pulling the dough towards you with the spoon and keep turning the bowl.This should not take more than 2-3 minutes. When touched and the dough doesn't stick to your fingers cover and let it rise for about an hour. Then punch down the dough and give it another 15-minute rest. Now it's ready for grilling!
OK, you've got the dough, you've got the "sticks". Now you just have to get the fire going. Use a lot of charcoal and let it all burn down. When there are no more flames then get ready for a Culinary Experience!!
For the grilling you will also need:
walnut or almond flour (REALLY finely ground) mixed with a little sugar
coconut (possibly unsweetened- strange but the sugary kind is too "wet" and doesn't stick)
Use a handful of dough and on a wooden board roll it int0 a 1/2-inch (1/2 cm) thick "rope". Next coat the wood with oil. Holding it in your right hand make a loop on the top with the dough tucking in the end. (photo) Keep rolling the stick (holding it by the steel part) and at the same time gently pull the dough to the left and wrap it on the wood. When you run out of dough simple tuck in the other end. This way the dough -hopefully- will stay on the wood tightly and will not get loose during baking.Next lay it on the wooden board and give it a couple of gentle rolls to even the dough. Coat it with oil, then with sugar and go for the grill!
For the grilling you will also need:
vegetable oil
sugar
For the finishing touch you may use any of the following:
sugar mixed with cinnamonFor the finishing touch you may use any of the following:
walnut or almond flour (REALLY finely ground) mixed with a little sugar
coconut (possibly unsweetened- strange but the sugary kind is too "wet" and doesn't stick)
Use a handful of dough and on a wooden board roll it int0 a 1/2-inch (1/2 cm) thick "rope". Next coat the wood with oil. Holding it in your right hand make a loop on the top with the dough tucking in the end. (photo) Keep rolling the stick (holding it by the steel part) and at the same time gently pull the dough to the left and wrap it on the wood. When you run out of dough simple tuck in the other end. This way the dough -hopefully- will stay on the wood tightly and will not get loose during baking.Next lay it on the wooden board and give it a couple of gentle rolls to even the dough. Coat it with oil, then with sugar and go for the grill!
Hold it far enough from the charcoal so it doesn't burn yet it bakes through and KEEP TURNING IT slowly! Thanks to the long handle you don't have to stand too close to the heat. After some time (?) the sugar should be changing color and caramelizing. I would say if the heat is right (hot enough but not TOO hot) maybe 2-3 minutes. It needs to reach a dark brown color! (photo) If it browns too quickly, just hold it further away from the heat and if it takes way too long (specially towards the end of your batch) you should move it closer.Just before it turns into ashes (just kidding....) meaning it is nice dark and shiny quickly coat it with one of the above mentioned finishing "flavors" You kind of need to be fast -before the caramel solidifies- so the "flavors" can stick to it. You can also leave it as is, with just the caramelized sugar. Use a fork to remove it from the stick (Careful, VERY hot and STEAMY!) Enjoy!
Check out this blog for more and don't miss this video.
Subscribe to:
Posts (Atom)